
So you’ve hit the record store and come back with a hoard of classic old vinyl records.
….Or, perhaps you’ve inherited or recently received a box of records and you’re excited to dive in.
You flick through the collection, select a record, and gently place it on your turntable.
As the stylus lowers and makes contact with the groove, you’re assaulted with a wall of pops, clicks and crackles.
Damn. These records sound terrible!?
The good news is, you can easily restore old records, giving them a new lease of life.
Check out our full guide on how to clean vinyl records for the ultimate guide, but today, we focus specifically on how to clean old vinyl records.
We Can Clean A Record, But We Can’t Perform Miracles
You can absolutely clean old vinyl records (removing the pops and clock) and return them to their former glory.
…within reason.
Cleaning out dust, dirt, oily fingerprints, and other nasties is one thing, but it’s important to remember that no record cleaning method can repair a scratched or worn-out record.

The Best Way To Clean Old Vinyl Records
With realistic expectations in mind, let’s get to work. Here’s the best way to clean old LP records and the process we follow to get great results week-in-week-out.

Step 1: Always remove the loose dust first
When you pull your old records from their sleeve, there’s a good chance they have a lot of loose dust and particles on the surface. Before doing anything else, aim to remove as much of the dry, loose dust as possible.
We don’t want to risk turning this dust into sludge with record cleaning fluid. The best way to remove surface dust is with a carbon fiber record brush.
As the record spins on the turntable, gently offer up the carbon fiber brush so it just tickles the surface. Don’t squash the bristles, as this will hinder their ability to catch loose dust. (Check out our full guide on how to use a carbon fiber record brush for more detail).
Step 2: Select the Right Record Cleaning Fluid for Cleaning Old Vinyl Records
With the loose stuff safely removed, we need to apply record cleaning fluid if we’ve any hope of tackling decades of built-up grime and entrenched dust deep inside the groove.
Worse still, we could be looking at records that have mold growth on the surface from years of over-exposure to humidity and moisture. No amount of dry cleaning with ANY record brush is going to remove that kind of grime.

For regular record clean, I use GrooveWasher G2. It’s my go-to record cleaner and I’ve been using it for years now to clean new and old vinyl records.
Assuming, though, you’re reading this because you’re cleaning old, very dirty records, you’ll undoubtedly benefit from something a little stronger.
For this very purpose, GrooveWasher developed their stronger G3 formular, which contains an increased amount of surfactants and emulsifiers.
Together, these ingredients aid in reducing surface tension, dissolving oily grime and holding unwanted dirt, mold, mildew, and dust in suspension.
(Sound Matters readers receive 10% off direct orders from GrooveWasher when using the discount code: SOUNDMATTERS10). (EU/UK Customers can use the same discount code at twelve-inch.com).
Step 3: Apply Record Cleaning Fluid
I recommend you follow our complete guide on how to clean vinyl records for further detail, but the following are some tips explicitly concerning old, very dirty records.
Tip One: Allow The Fluid to Sit
When cleaning vinyl records, it’s best to allow the fluid a minute to sit on the record surface. This gives the ingredients time to work.
If your old vinyl records are very dirty, you’ll likely find it beneficial to leave the fluid sitting for longer than normal.
Tip Two: Repeat The Cleaning Process if Necessary
Depending on how dirty they are, old records often benefit from multiple cleans.
Keep in mind, these records might never have been cleaned by their previous owner. We could be dealing with decades of dust and grime, or even mold and mildew.
It’s unrealistic to expect all this to come off easily with a single pass.
Tip Three: Visually Inspect The Record for Problematic Areas
Visually inspecting the record surface under an LED light can help you identify specific areas where the grime is worse. Try applying additional fluid here and gently use your microfiber cloth to remove the grime (brushing with the grooves, not across the record).
Tip Four: Keep Your Microfiber Cloth Clean & Replace it Regularly
One criticism of cleaning vinyl records by hand is the potential for spreading dust and dirt from one record to the next.
This is a legitimate concern and can be a problem if you re-use the same microfiber towel or cleaning pad over multiple records.
The best way to mitigate this problem when cleaning many records in one sitting is to use multiple microfiber cloths and clean them all regularly.
You can clean microfiber towels and pads using distilled water and a little dish detergent.
Don’t be tempted to put them in the washing machine, as you’ll contaminate them with lint and make them unusable for future vinyl record cleaning.
Tip Five: Apply a Secondary Rinse Stage
If you choose G3 as we recommend for cleaning old vinyl records, you’ll need to do this anyway; the trade-off when using a stronger cleaning fluid is you often need to perform a secondary rinse stage using distilled water to avoid leaving any residue behind.
That said, a secondary rinse stage is often beneficial regardless.
Tip Six: A Record Cleaning Machine Can Improve Results
When cleaning a large amount of records in one sitting, record cleaning machines (such as a vacuum or ultrasonic machine) will make lighter work of the entire process.
You can use your favorite record cleaning fluid with a vacuum-based record cleaning machine, but in this case, you’ll be sucking all the dirty fluid from the record surface, which can improve efficiency and reduce the risk of moving dirt from one record to the next.
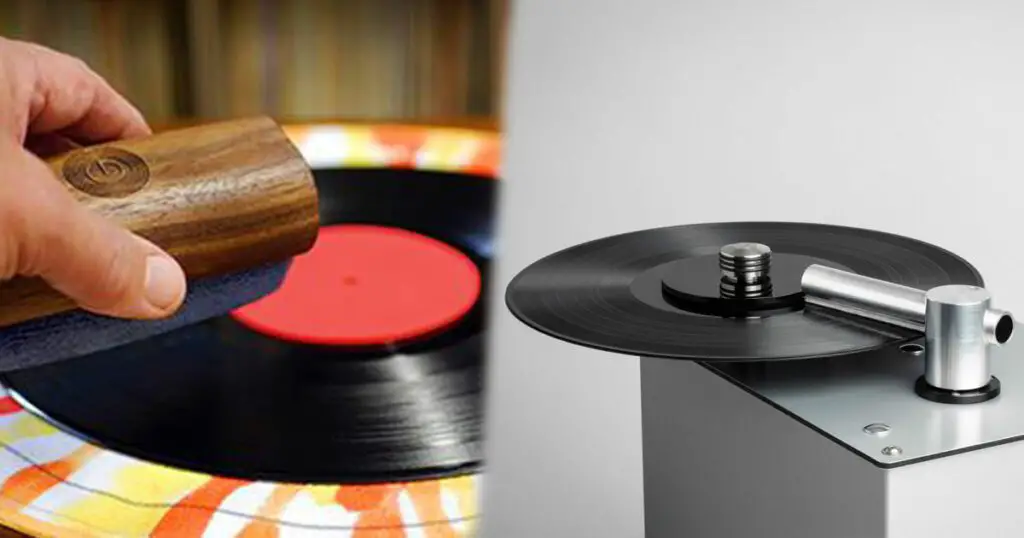
Tip Seven: Add Surfactants to an Ultrasonic Record Cleaner
If you’re lucky enough to own an ultrasonic record cleaning machine, great – this process is hands-down, one of the best ways to clean old vinyl records. (Again, check our complete guide on how to clean vinyl records to learn more about the pros and cons of each approach).
Adding a surfactant to your tank of distilled water will reduce water surface tension, allowing the fluid to more easily penetrate the groove and let the tinny cavitation bubbles to lift surface grime gently.
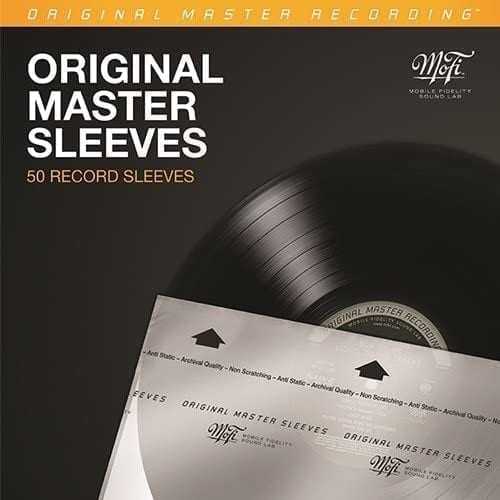
Tip 8: Always Replace the Old Record Sleeve
It might seem obvious, but there’s no point cleaning a record, only to store it in a dirty sleeve.
Always store a freshly cleaned vinyl record in a new anti-static sleeve. This will ensure your record is stored safely, and will we help to reduce static build-up, which ultimately will help your record stay clean for longer.
The MoFi polyethylene inner sleeves are a popular option and the original “rice-paper” style design for archival quality storage.
Storing vinyl records correctly is half the battle concerning keeping records clean in the first place!
Tip 9: Never Clean Very Old Shellac Records with Alcohol
Lastly, no advice on how to clean old vinyl records would be complete without an important note about alcohol and shellac records.
Older shellac records (usually 78s) aren’t strictly “vinyl records” as they’re not made from PVC, but it’s important we cover this under the banner of old records.
Shellac records cannot be cleaned with any record cleaning fluid that contains alcohol as even a small amount can melt the shellac material. In the case of cleaning shellac 78s, I can highly recommend Pro-Ject’s Wash-It formula, which is entirely alcohol-free and safe to use on shellac.
The Bottom Line
Record cleaning remains one of the most talked-about subjects at sound matters, as we frequently receive questions and requests on the best approach.
In particular, how to clean old vinyl records is a hot topic, as new generations discover old collections and start to discover the joy of music on vinyl.
Patience will be rewarded, but remember to keep realistic expectations. Only ever use the minimum amount of “force,” so to speak, when cleaning a record. Overly aggressive cleaning fluids, such as those with a high amount of alcohol, may not be safe to use on your records.
At Sound Matters, we advocate a gentle approach to record cleaning. For a complete list of the methods we recommend avoiding, check out our guide on how NOT to clean vinyl records.
I am a huge fan of Groovewasher, not only are their products great (I have their weight and cleaning system) but they are an extremely ethical company. I ordered a system for my daughter in NZ, just before the worst of COVID and it never arrived. Groovewasher gave me a full refund no questions asked.
Their cleaning system has saved a few albums for me but there are still a few I’d like to try one of the vacuum systems on.
I have a few ways I clean my Records, Before I got an ultrasonic record cleaning machine or my Project VC-s vacuum record cleaning machine. My old method of cleaning records was with a Q-tip, distilled water and isopropyl alcohol. I put my Distilled/or reverse osmosis water which I get it Whole Foods two gallons for $0.98 &, a little Isopropyl alcohol, I then mixed it up in a jar or a cup, then dip the Q-tip in it then as the record is spinning on the TT I’d pace it lightly on the record (use the side of the Q-tip first then the top) as the record spins I twirl the Q-tip & wiggling it back in forth. The Q-tips should start to turn Brownish, Grey or even Black then you know it’s cleaning. Then I did some more research & invested in the ultrasonic machine (buying just the tank) and building the rest of it myself. I let the records spin in the tank with reverse osmosis water for 5-20 minutes with a little heat. I then let them spin dru with a fan for 10 or so minutes then wipe them clean with a microfiber cloth. I have to say the Ultrasonic works great but I felt I needed to some how get more of the liquid off, letting it spin dry wasn’t doing it for me I still heard some Pops –crackles -fizzles etc…
So I did some more research & found the Project VC-s vacuum record cleaning machine. It worked great I had no problems but 2 month into it it leaked it was made out of that Compressed wood ( I call IKEA wood) so they up graded me to the VC-e machine a lot smaller all aluminum the only problem is the drain hole is directly under the record so I mad a vent to vent it out to the side. Sometimes I use both machines when I can or just use one. I live in a Co-Op (neighbor above me is not thrilled about my Vacuum machine) my new fluid is either TM-8 , L’Art du son or the Groovinator. With either the Project VC-e machine or the Ultrasonic.
VERY IMPORTANT TIP!
DO NOT use fabric softener when you clean your microfiber cloths or whatever towels you will use to wipe your records. Fabric softeners actually have ingredients that can be abrasive to painted surfaces (e.g., cars, motorcycles, etc.). I don’t know for sure that this would affect vinyl the way it could clear-coat, but I’m not going to find out the hard way by ruining a record.