In this tutorial, you will learn how to convert your vinyl records to digital files using a software package called Vinyl Studio.
Vinyl Studio is an all-in-one package that allows you to record your vinyl records, import individual track information, split your recording into individual tracks, and then save them as individual files as a complete album.
Vinyl Studio also allows recording vinyl to CD using its “burn CDs” function, which enables you to take your files and create audio CDs without the need for a third-party program.
Unlike the popular free software Audacity (also popular for digitizing vinyl records) Vinyl Studio does cost a small amount of money for a license.
If you’d like to save a little money, check out my previous guide on digitizing vinyl records using Audacity.
However, I believe Vinyl Studio is worth the small up-front cost of $29.95 when you consider how much time you’ll save with the program’s ability to automatically map out track markers based on track names and album data drawn from databases such as Discogs. All in all, the time this will save you is priceless.
The connection with Discogs eradicates the time-consuming process of manually typing out each individual track name while painstakingly dropping in track markers one by one.
Connecting Your Turntable to a Computer
Firstly, you’ll need to establish how you’ll connect your turntable or record player to a computer.
There are three methods I recommend:
1: Via a USB Turntable. This is by fair the easiest method, so if your turntable has a USB output, you’re already good to go.
2: Using a phono preamp with a USB output. If your turntable doesn’t have USB connectivity, consider buying a phono preamp with a USB output. The Rega Fono Mini A2D is a great affordable option.
3: Using an Audio Interface. This method involves a little more work with cables, but can yield the best quality results. You’ll need some RCA-1/4 inch jack cables to run from your phono preamp output to the audio interface. In this tutorial, I’m using the SSL 2+ audio interface, which is capable of recording files up to 192KHz 24bit (far higher than the CD standard of 44.1KHz 16bit).
For more information on connecting your turntable to a computer, check out my previous guide.
Vinyl Studio Tutorial – Step-By-Step
To download Vinyl Studio, head over to their website.
You can download a trial version for either Windows or a Mac giving you the chance to sample the software before you commit.

When you first launch Vinyl Studio, it will prompt you to create a “collection” as a folder on your hard drive. This is the location where all your recordings will be saved.
A single collection is enough for most users, but you can create multiple “collections” if you so wish.
Setting the Input Device
Before we can record our first album, we first need to set the correct input and output devices.
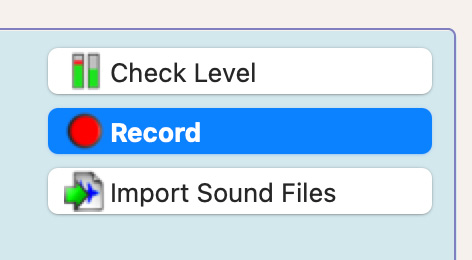
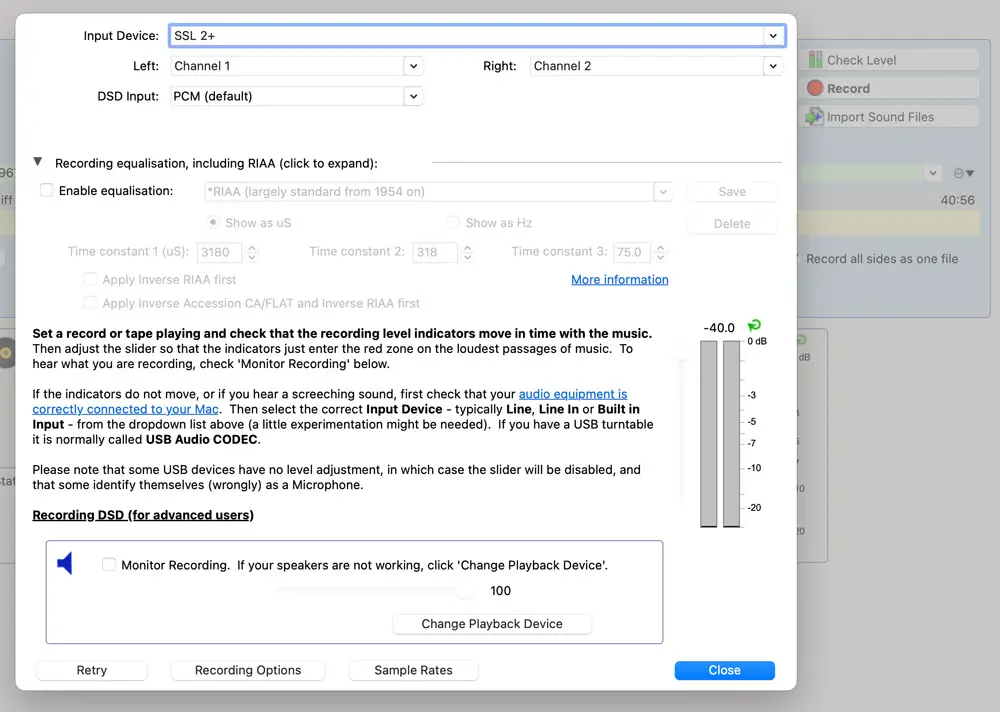
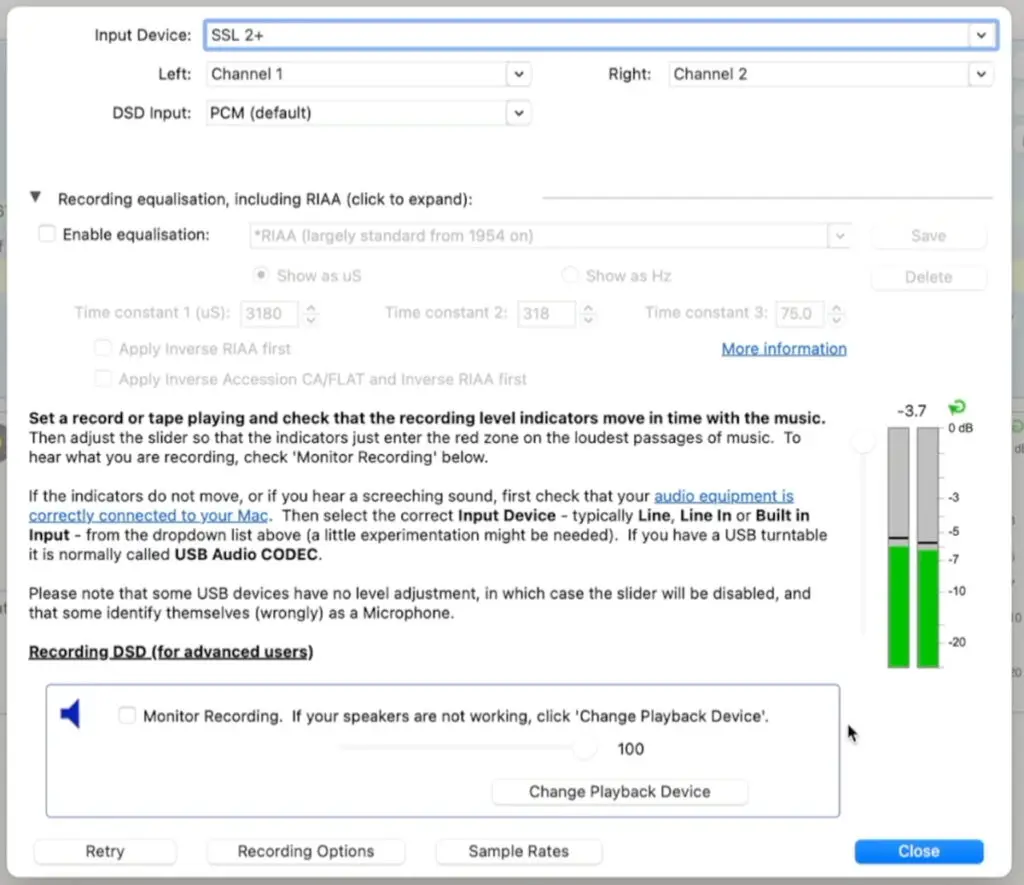
To set your input device, hit the “check level” button.
From this section, you can change the input device depending on how you’re connecting the turntable.
In my case, I’m going to select my SSL 2+ from the drop-down list.
After this, we also need to set the appropriate audio quality depending on the options available with your chosen device.

Vinyl Studio has a really handy function that will show you all the sample rate and bit depth options available for your device; simply hit the “sample rates” button.
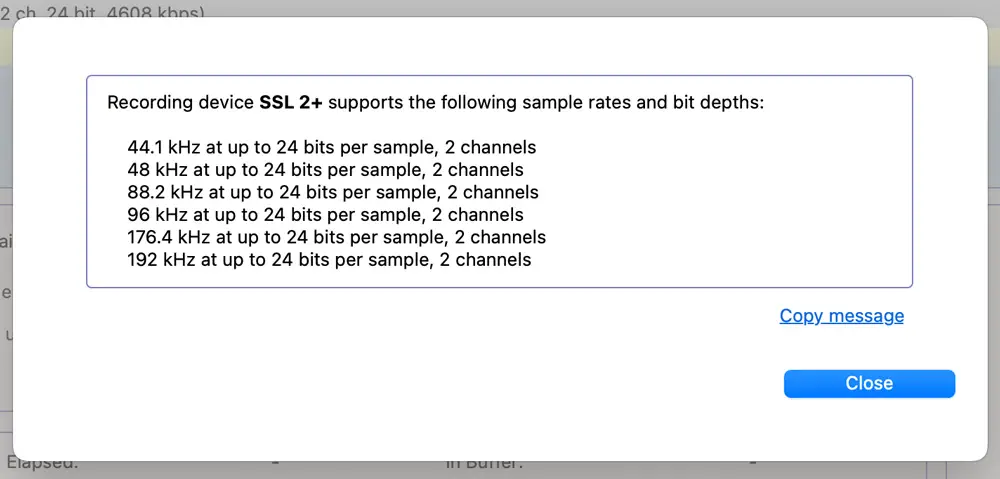
In my case, I can record all the way up to 192KHz 24bit. If you’re using the Rega Fono Mini A2D, for example, your options will be limited to 48KHz 16bit, which is still a touch about CD quality and perfectly adequate for most users.
To change the sample rate, hit the “recording options” button. Here you can choose your file type. I’m choosing AIFF, which is a lossless audio format and perfect for Mac users who want to pull their recordings into Apple Music.
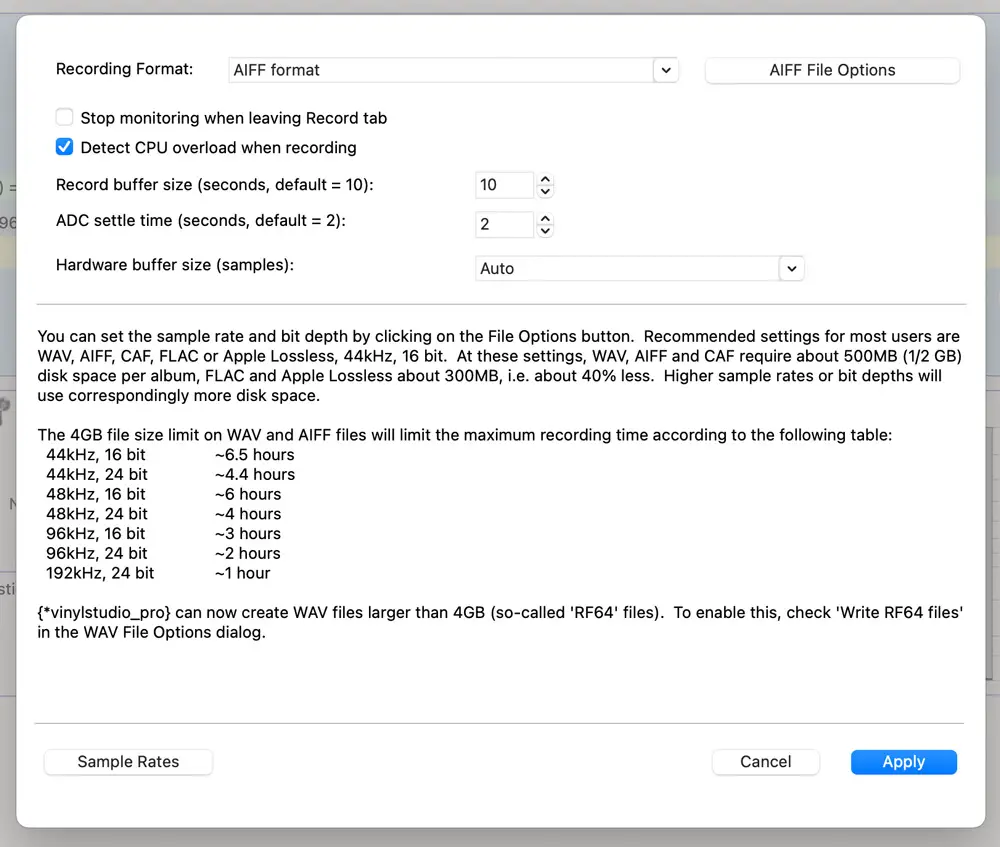
The .WAV format is another high-quality lossless option. In any case, I recommend recording in a non-compressed (lossless) file format rather than compressed audio formats such as MP3 or AAC. You can always create MP3s from your full quality recordings later on if you’d like.
Sticking with the .AIFF file format, I then hit the “AIFF File Options” button to reveal a drop-down menu for setting sample rate and bit depth.
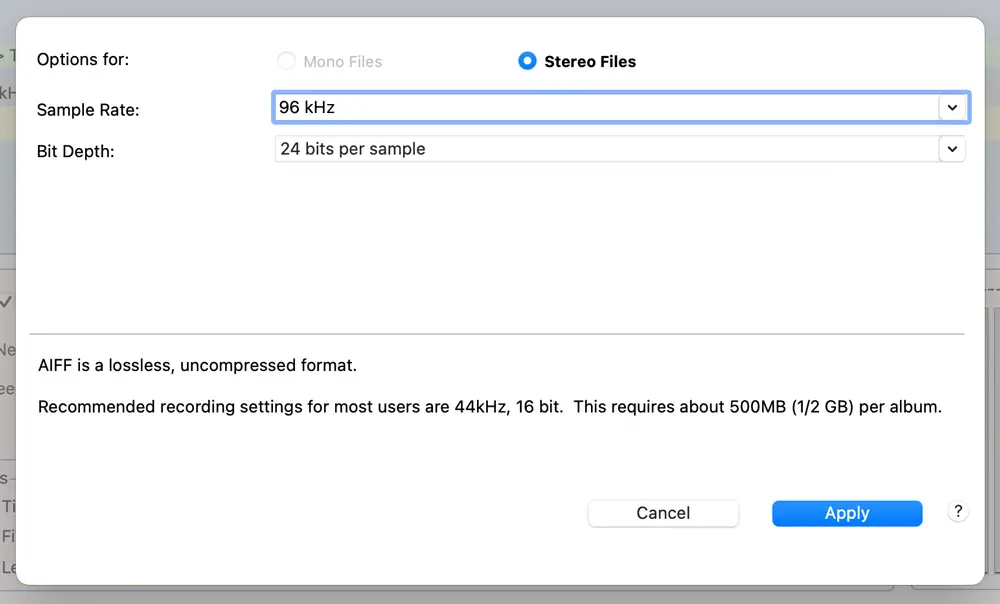
I want to create a nice high-quality archive of my record, so I opt for the 96KHz 24bit settings. While I could go all the way up to 192KHz, this will greatly increase my file size, and I defy anyone to tell me they can truly hear the benefit of such a high sample rate. For my needs, 96KHz is a nice middle ground.
Check Input Level
Now is a good time to check the signal level coming in to ensure don’t get distortion.
Pick a loud part of your record and play it back into Vinyl Studio. Use the “check level” section to monitor the signal and ensure it doesn’t “clip”. This will happen if the signal hits 0dB. Equally, we want a good, strong signal coming in to maximize signal-to-noise ratio.
Choosing the Output Device
After setting up the all-important input device, we also need to choose an output so we can hear and monitor our recordings.
To set this, hit the “change playback device” button, which will reveal another drop-down menu where you can choose how you’ll hear your recordings. In my case, I’m sticking with the SSL 2+, but you can equally choose your computer’s built-in speakers if desired.
Note: ticking the “monitor recording” button shown below is helpful if you want to hear the recordings on input and don’t have any hardware monitoring on your input device, say in the example of a USB turntable connected directly to your computer with no speakers for reference monitoring.

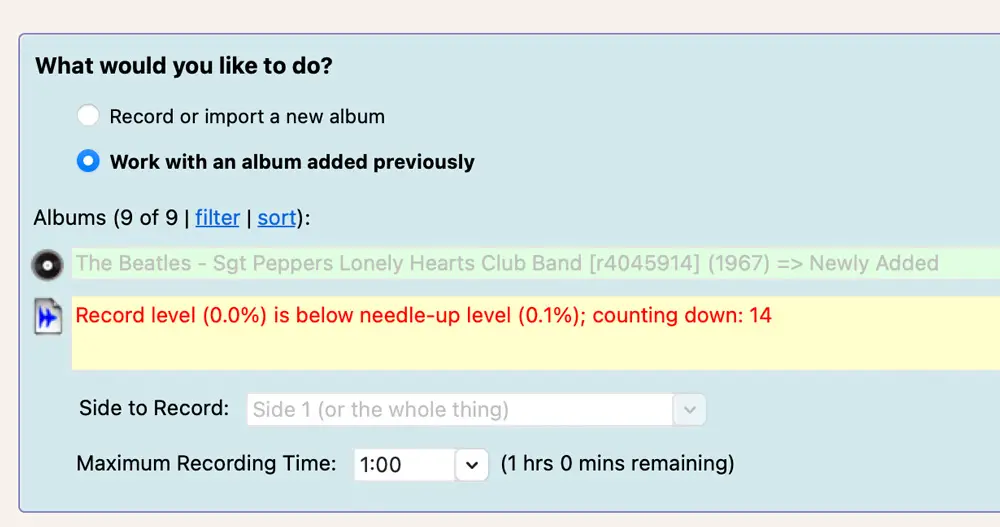
“Wait for Needle Down”
On the main page you’ll see an option labelled “wait for needle down”. This is a really helpful feature that, when enabled, means Vinyl Studio will not begin recording until the stylus hits the record. Equally, when you lift the stylus up, the recording will start a countdown before it pauses.
This function is really handy for reducing file size, but also allowing you to pause recording when flipping the record over. I recommend you keep this option ticked.
Importing Track Data
Before starting the recording process, it helps to import the album and track information.
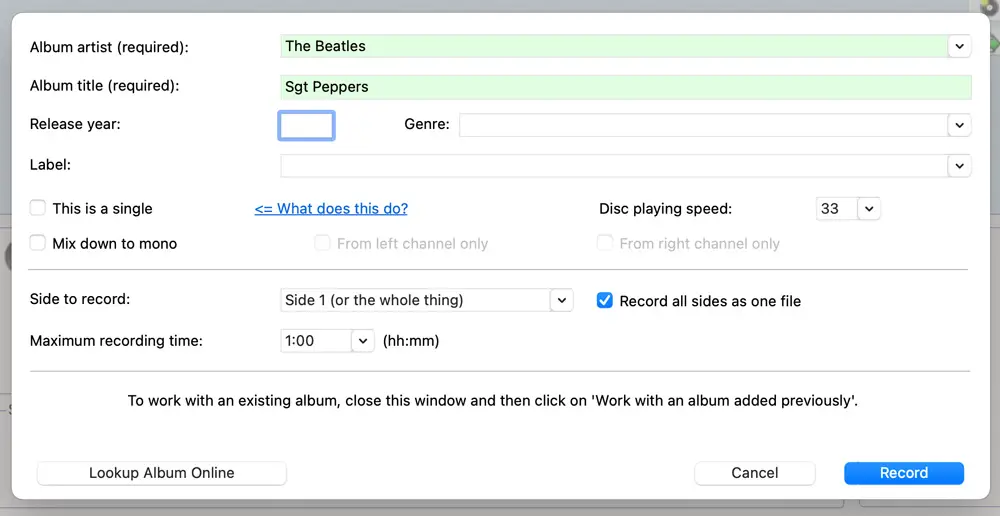
To start this, hit the “record or import a new album” option and then tap the “record” button.

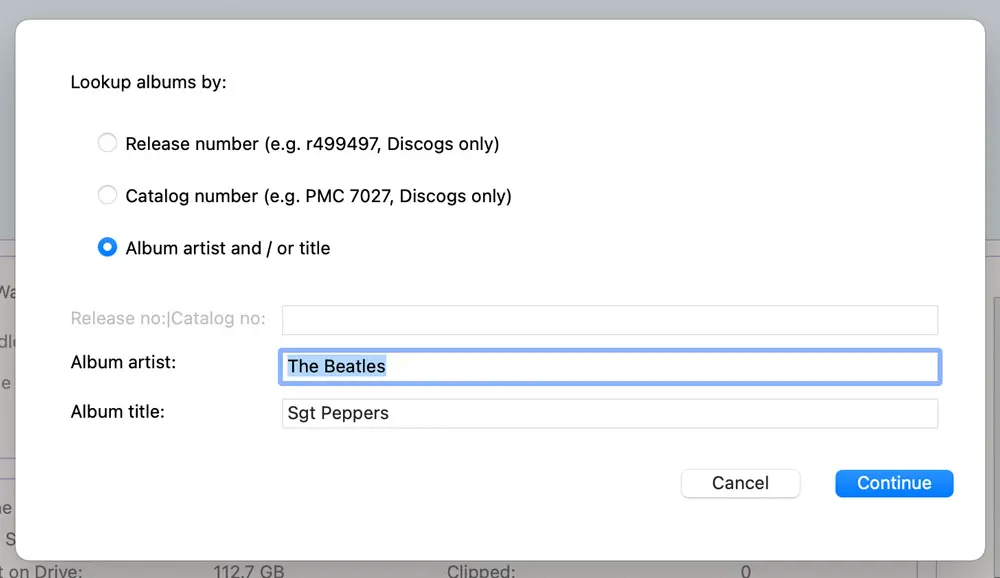
From here, you’ll be prompted to enter an artist and album name.
In my case, I’m recording a copy of The Beatles Sgt Peppers. I want to capture this record as it’s a first-pressing mono copy, which sounds quite different to the stereo version available on streaming services, for example.
By hitting the “lookup album online” button, Vinyl Studio can use online databases, such as Discogs, to pull in all the track names and much more. I can even fetch album artwork.
This saves a heap of time entering all this information manually, and will really come into its own later when we come to spit our recording into individual tracks.
Important: when selecting a listing, make sure you select a version without any additional bonus tracks. We only want to import the original vinyl track listing without any additional modern add-ons.
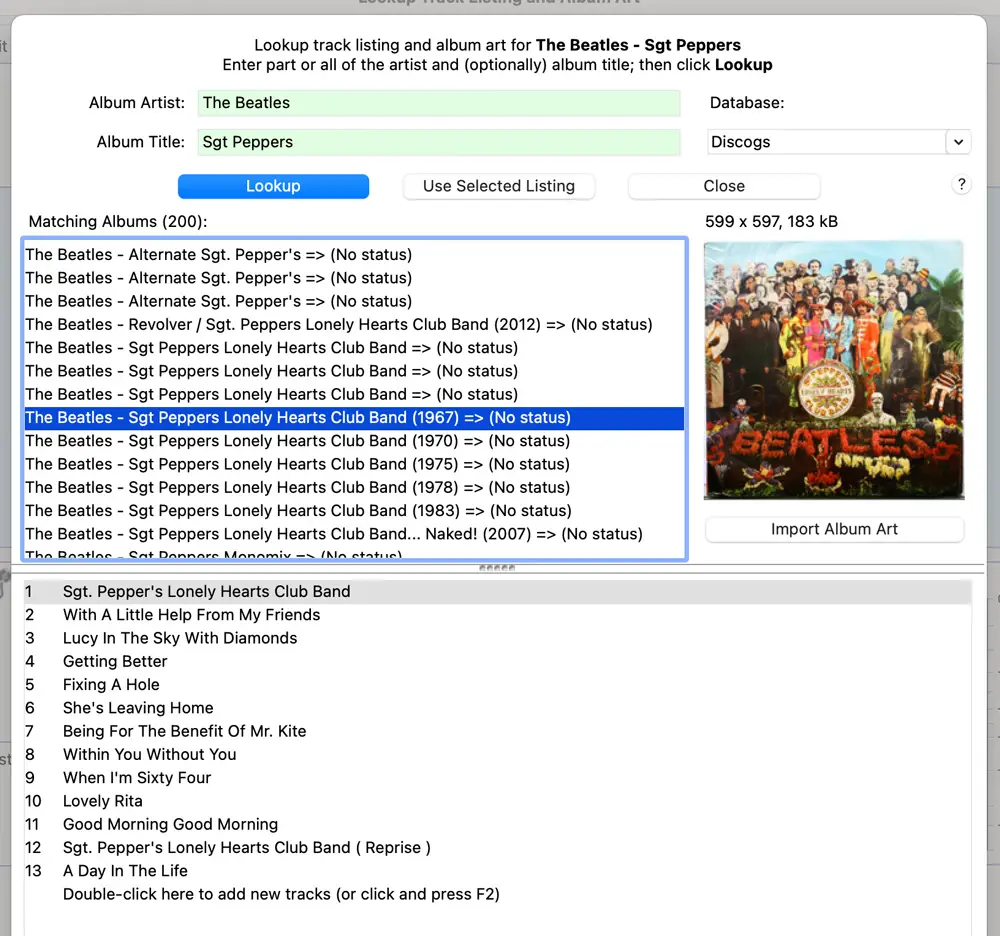
Once you’re happy, confirm your selection by hitting the “use selected listing button”. This will be applied and we can now close this menu.
Next, you’ll see how the data has updated, including the album release year, and even the label.
You’ll notice there is a tick box labeled “record all sides as one file”… This is important, and I recommend you leave this ticked as it will save time later on.
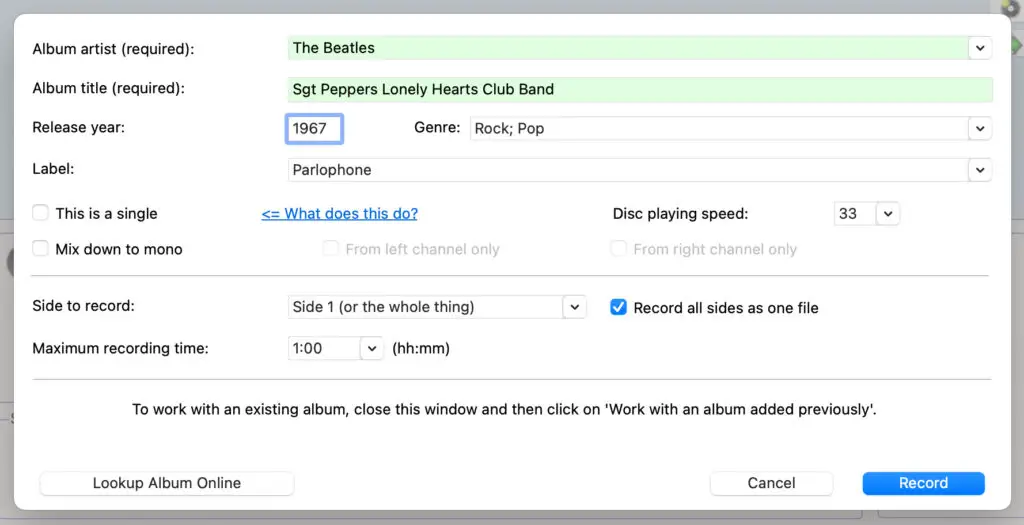
With this option ticked and the “wait for needle down” option selected, Vinyl Studio will pause recording at the end of each side, allowing you to flip the record over and commence recording… Thus creating one seamless file rather than two (or more) files depending on how many sides your record has.
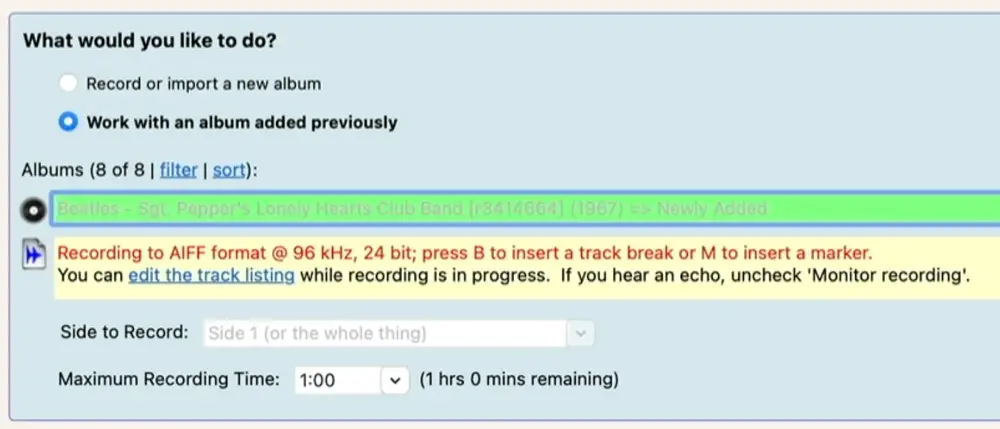
Recording a Record
When you hit record, Vinyl Studio will now prompt us to ensure the stylus/needle is lifted.
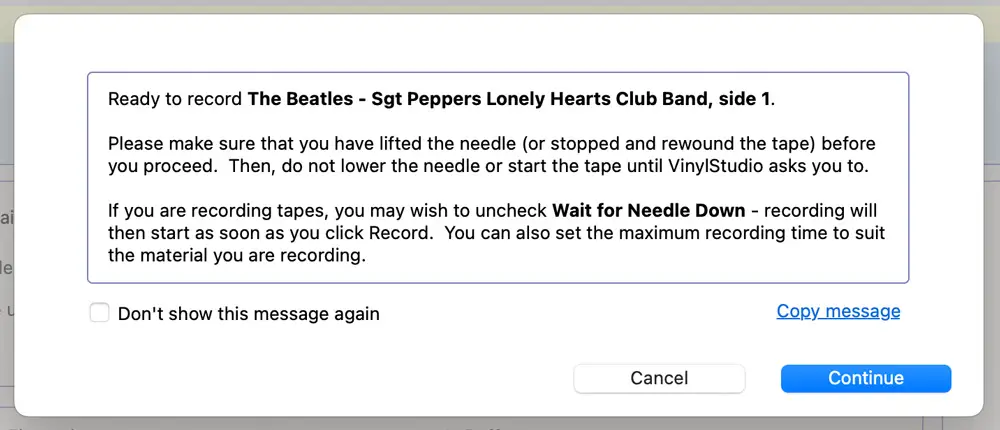
Once we press continue, Vinyl Studio will measure the input signal of the lifted cartridge.
With this measured, the software can wait for the stylus to make contact with the record before recording starts.
Once it does, recording will commence and we just need to wait until the first side is finished.
When we reach the end, simply raise the tonearm and Vinyl Studio will detect that the signal is back to the “needle up” level, triggering a countdown to pause the recording.
This allows us to flip the record over while the recording process is paused.

Once you’re ready to go with the second side, simply press continue and Vinyl Studio will again wait for the stylus to make contact before recording continues.
Once you reach the end of your record you can hit the “stop” button and the recording process will cease having created one continuous file.
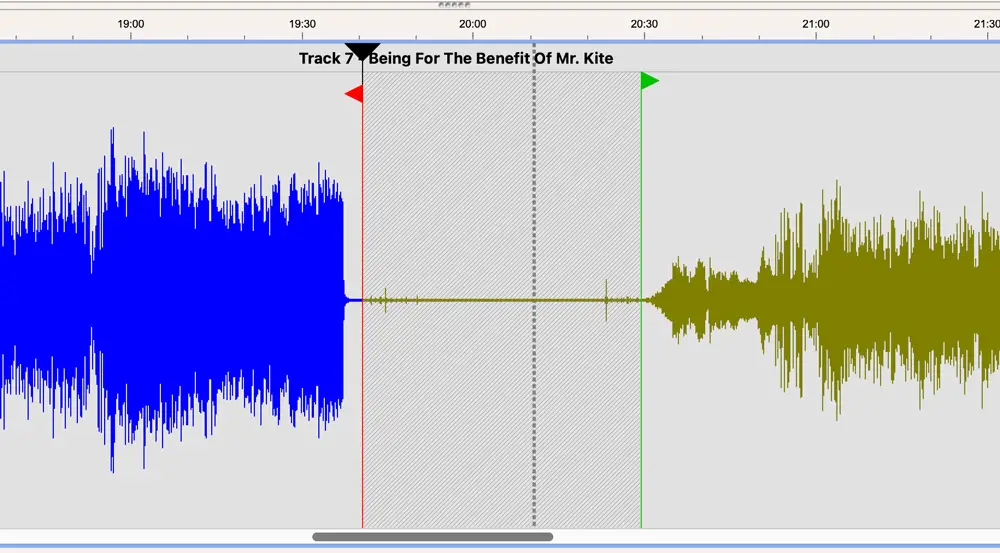
Splitting Tracks
With the recording complete, head to the “split tracks” tab.
Here, you will see that Vinyl Studio has pulled in the track information we imported and attempted to place markers roughly where each track starts.
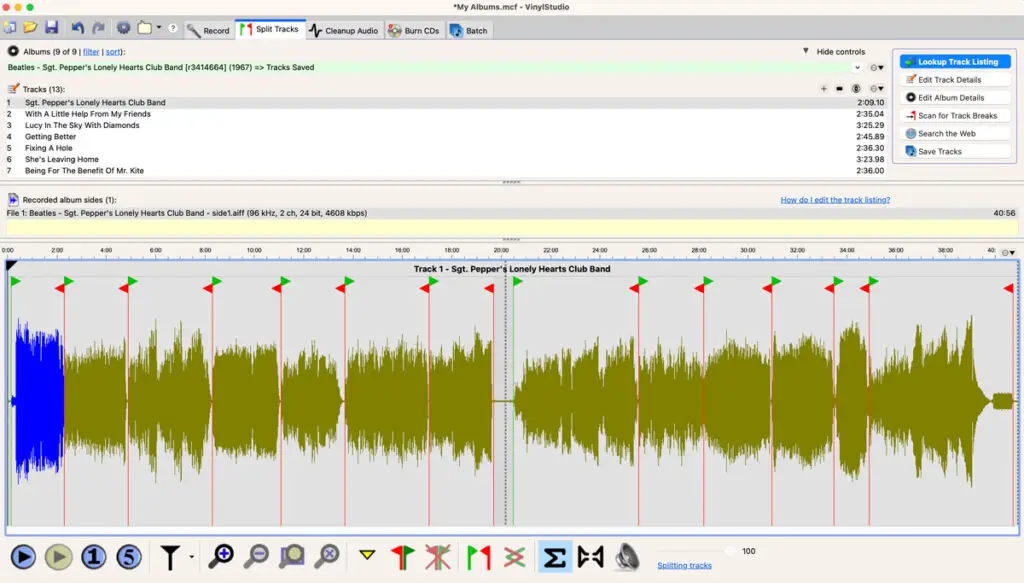
You’ll have to tweak the position of these markers and adjust them more significantly where the larger gap is at the end of a side, but it gets us very close and saves a lot of time compared with manually inserting label markers in Audacity and typing out each track name.
I recommend a good set of headphones for this task to ensure you get the placement just right.
Use the zoom tool to get closer into the recording and use your mouse cursor to slide them into place. I like to put them up against the start of each track, leaving the spacing between tracks exactly as it was on the record.
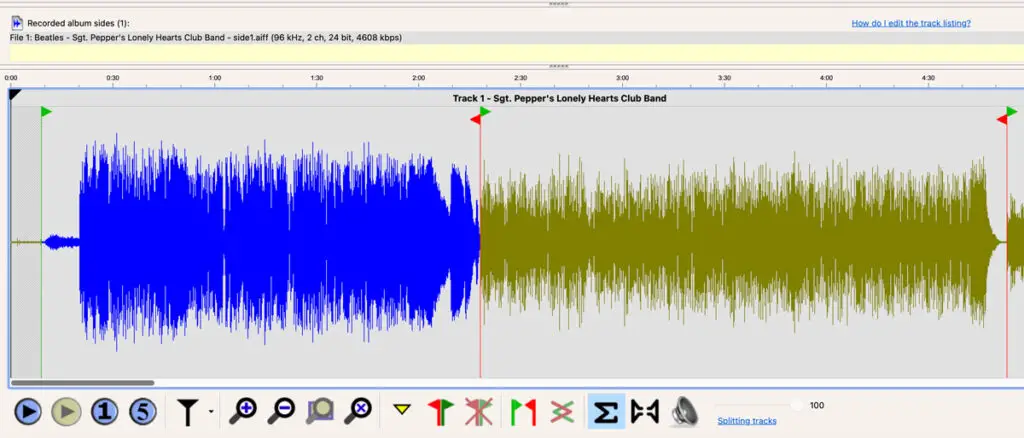
At the end of side 1, you’ll need to separate the red and green markers and drag them to the end of side one and the beginning of side two, respectively. The space between these markers will be deleted, making the change from side one to side two seamless.
Tip: You can use the space bar on your keyboard to trigger the play button. This saves you from having to drag your mouse down to the play and stop button every time you want to test a track marker’s position.
At the end of your record, there will be a dead-end red market, which indicates this is the last track. Adjust this until you’re happy, and congratulations, your tracks are now ready to export!
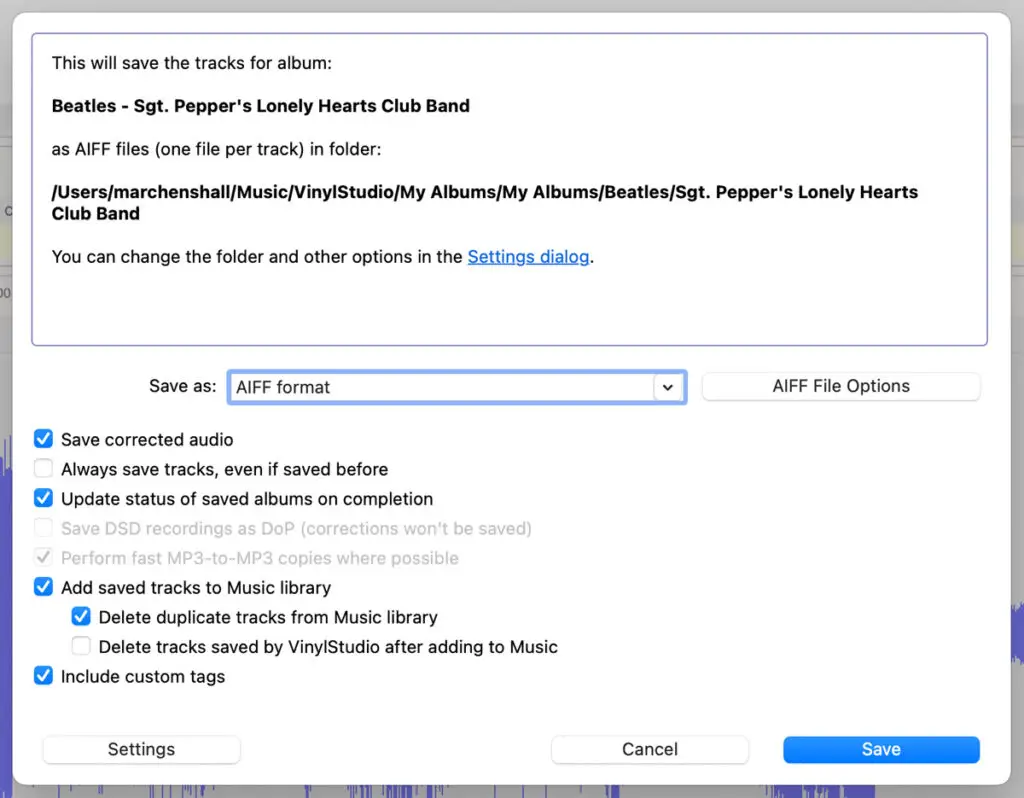
Exporting Tracks
To export your album, hit the “save tracks” button. This will open the export tool where you can choose to create full uncompressed versions, or use one of the many compressed audio format options, such as MP3 or AAC. Also worth considering are the lossless compression formats, such as FLAC (for example).

For the purpose of this demonstration, I’m creating a full archive edition of my album and will be exporting as .AIFF files.
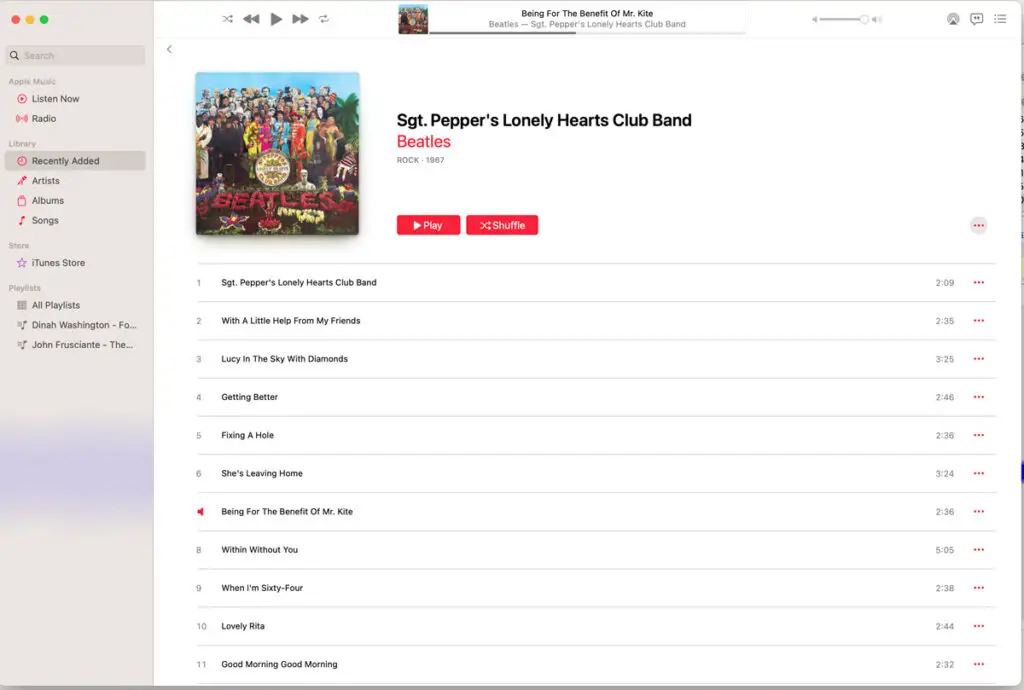
Note: also on this menu for Mac users is the “add saved tracks to Music Library” option. This is a handy feature that automatically adds your exported albums to the Apple Music library.
This is still possible on a Windows machine, but requires an extra step.
In Windows, you will have to change the export location of your files to Apple Music’s “Automatically add to Apple Music” folder. Anything placed in this folder will automatically appear in your Apple Music library.
Congratulations! You’ve just archived your first vinyl record with Vinyl Studio. In future tutorials, I will also be covering how to “clean up” your recordings to reduce pops and clicks and how to burn your albums to a CD, all in Vinyl Studio.
If you have any questions about the process covered in this article, please do pop them in the comments section below.
Product Recommendations:
SSL 2+ Audio Interface on Amazon
Marc, how do you record double albums? per side or long file(2hrs) Thanks
I used both programs. In my experience, Audacity does a better job in the clean-up process- automated and manual as well.
But I get lost in the exports and imports because the native files are not compatible. Last time I did some work on this was over a year ago (Manu Dibango: “O Bosso”) and I would need some advice to which way you would suggest to start. Record in Audacity then export to VS or the other way around?
Thanks
Thanks for the review of what looks like a decent product. I’ve used Audacity for this purpose in the past and the process was much more onerous than this!
One thing I’d like to point out is that when selecting a format for storage, I’d recommend a lossless format like FLAC or ALAC over the uncompressed WAV or AIFF files. These store the files as bit-identical to the uncompressed files but use some clever algorithms to reduce the file size by approximately half. Hard drive space is cheap these days, but not free, and the hi-res formats of 24/96 and above have some chunky file sizes!
Marc, thank you for this article as the ease of use over Audacity is unparalleled. Vinyl Studio saves so much time and effort, it is well worth the cost. I have been using Vinyl Studio since late 2020/early 2021 and have found that the Vinyl Studio software has been rock solid for recording my LP’s that I purchase in the 60’s and 70’s, including Beatles, Rolling Stones, CCR, Beach Boys, etc. The support from Vinyl Studio has been super fast response and they solved my issues with just one response. This was early on when I was just starting out using Vinyl Studio. It was mainly human error on my part.
I love the suggestion of using the SSL+ mixer for recording LP’s and direct connect to my MacBook Air versus using USB stick and having much better audio quality with the SSL2+. I had been using the USB out from my Denon 450USB turntable. I will be purchasing the SSL2+ very soon.
Thank you,
Keith
Nice video since I didn’t know about Vinyl Studio. I think I still prefer using Audacity with Stereo Lab Audiophile because the latter does more for vinyl ripping, along with other things, for about twice the price of Vinyl Studio. It’s especially helpful for vinyl that’s not that noise-free.
Just a note about sampling rates: If the anti-aliasing filters for A/D converters and D/A converters were perfect, then 40 kHz would be all we’d ever need. Of course, the filters are not perfect because they all have group delay distortion, a form of phase distortion, that can stretch back into the audio range. The higher the sampling rate, the less likely the distortion will extend below 20 kHz. Usually, 88.2 kHz or higher is best, and I usually use 96 kHz just as you do.
Could you tell us what VinylStudio is missing, compared to using those two programs in combination please? We’ll see if we can put it in.
And thanks to Marc what we feel is a very fair review.
A little tip for you: you can drag track break markers as a group by holding down the Alt / Option key. This can be a big time saver, especially at the start of side 2.
The Stereo Lab software looks interesting. I’ve got a copy of Pink Floyd “Wish You Were Here” that’s quad, so it would be interesting to decode it. Enjoy the music!