There are several reasons you might want to replace your phono cartridge. You could be upgrading the stock model shipped with your turntable, or you might be looking to replace an older model on a used deck. Either way, it’s important you take care to install your new cartridge with care and attention to detail.
As we always say at Sound Matters, the phono cartridge is your direct link between the record groove and your Hi-Fi. It’s the first point in the signal chain, so you can significantly improve the sound quality performance of even the most humble of turntables with the right cartridge installed.
Standard Mount or P-Mount?
The method you will use to replace a turntable cartridge very much depends on the mounting style of your tonearm and phono cartridge. There are two common types:
P-Mount: P-Mount cartridges are designed for plug-and-play convenience. All you need do is plug the cartridge into the end of the tonearm and secure it with a single screw. There are certainly pros to the p-mount design as it avoids the painstaking process of cartridge alignment (which we’ll get to later). The downside is, you’re limited in choice compared with the abundance of standard mount cartridges. P-mount is most commonly seen at the more affordable end of the turntable market.
Standard Mount: Standard (or half-inch mount) cartridges have four terminal pins at the back connected via four individual wires at the end of the tonearm (or using a half-inch mount headshell). They are attached to the end of a single piece tonearm—or a tonearm with a half-inch headshell—using two screws that are spaced 1/2 an inch apart.

Audiophile purists prefer single-piece tonearms for the rigidity they achieve, which is said to reduce resonance. Half-inch headshells make installing and swapping cartridges easier as you can install the cartridge away from your turntable. You can also seamlessly plug and play multiple cartridges for different purposes (for example, using a true mono cartridge for the best performance when playing mono records).
The installation process for single piece and half-inch headshell tonearms is basically the same; the difference is in how we correctly align the cartridge for optimum tracking performance.

Step-By-Step Turntable Cartridge Installation Instructions:
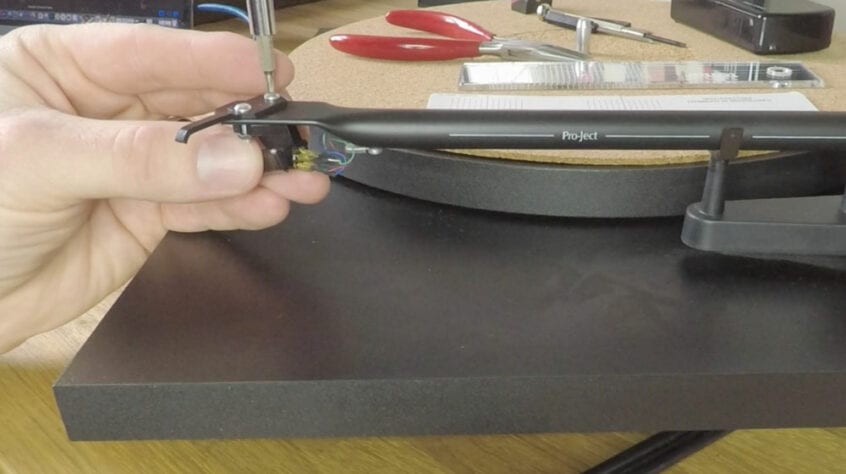
Step 1: Unscrew The Old Cartridge
Start by unscrewing the cartridge from the headshell. (Add or drop the stylus guard if you’re keeping the existing cartridge and want to protect the stylus).

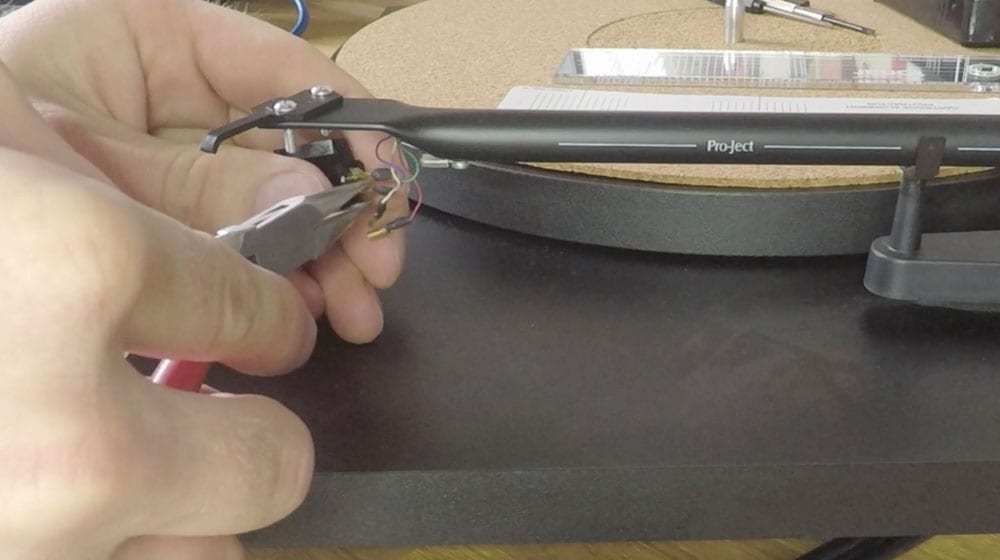
Step 2: Remove The Cartridge Wires
Gently remove the wires using a set of longnose pliers. Always pull the wires from the metal tip; do not pull the wire itself as you will almost certainly break the wires.
Step 3: Connect The Wires to Your New Cartridge
For this step, I like to remove the counter weight and preferably secure the tonearm in its resting place with a cable tie. With the stylus guard in place, gently connect the wires of your new cartridge using your longnose pliers. You’ll feel them click into place, but don’t push too hard as to risk damaging anything.
The wires are clearly color-coded and should be connected as follows:
- Red lead – R+ (Red)
- Green – R- (Green)
- White – L+ (White)
- Blue – L- (Blue)

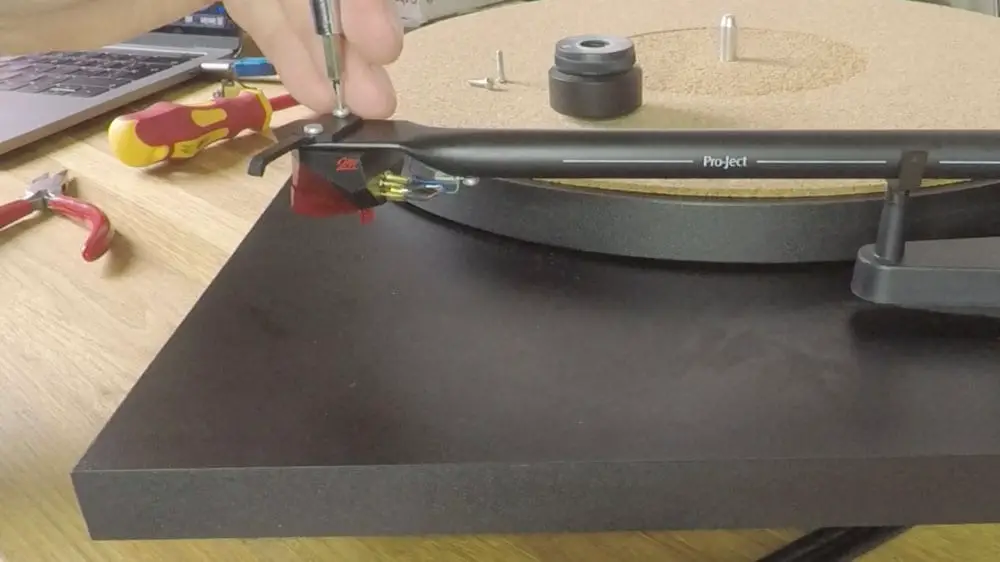
Step 4: Secure The Cartridge
Now screw the cartridge onto the headshell by slotting the screws through the holes from the top. Some cartridges require screws and nuts for attachment, while many newer designs have two threaded screw inserts that do away with the need for any bolts. Leave the screws firm but not tight for now, as we need to align the cartridge for optimum performance.
Step 5: Roughly Set The Counterweight Tracking Force
Re-attach the counterweight and roughly set the tracking force as per your cartridge manufacturer’s stated optimal tracking force. You can do this by balancing the tonearm so it floats parallel to the platter surface; this means we now have zero tracking force and can adjust the dial (which spins independently to the counterweight) so that it shows the number zero. After this, twist the actual weight so the dial moves with it. In this case we want to achieve 1.8 grams, which we can get by turning the weight to 18. Most turntable manufacturers will include detailed instructions on this process in your manual.
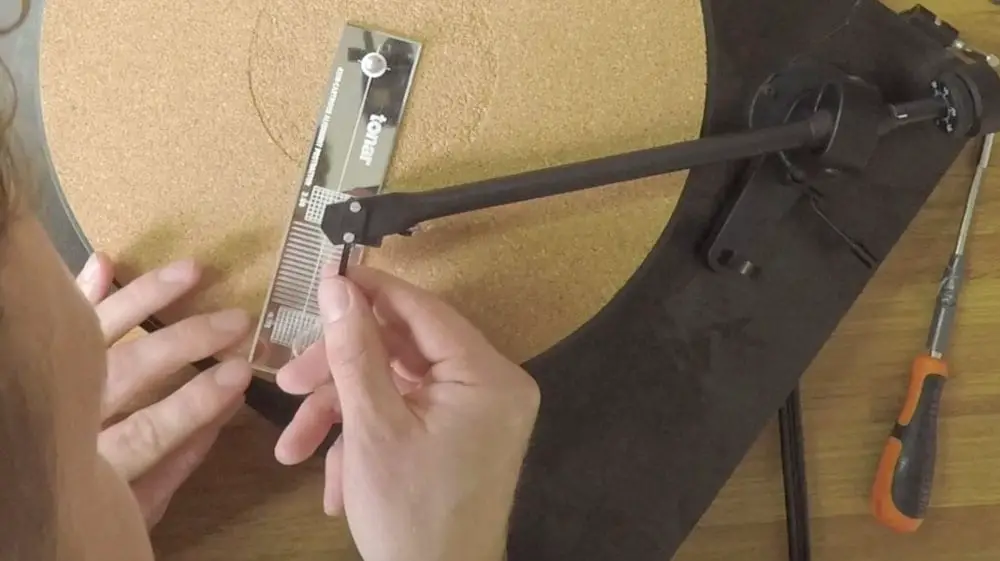
Step 6: Align The Cartridge
Using an alignment protractor, we need to ensure the cartridge is aligned for the best tracking performance across the surface of the record as it pivots from the beginning of the record to the run-out groove.
A cartridge protractor has two null points where the stylus becomes tangent to the record groove. When your cartridge cantilever aligns to both null points, you will get the best possible tracking performance across the record surface. Move back and forth between each point until you get the alignment dead on. It’s worth taking some time over this, so be patient and check from multiple angles.
Step 7: Set The Anti-Skate & Check Tracking Force
Adjust the tracking force. You will need to check the optimal tracking force as stated by the cartridge manufacturer and adjust accordingly. Before we do this, you should set the turntable anti-skate as per your turntable’s manual as this can have an effect on the final tracking force.
The traditional way to apply the stated downward tracking force is to get the arm to float above the platter and then using the counter-weight dial to adjust for tracking force, but this isn’t 100% accurate. A better way is to use the first method to get as close as possible and then fine-tune until you get the perfect tracking force using a digital tracking force gauge. We like the Neoteck model.
Alignment for S-Shaped Tone Arms
You’ll notice that on a straight tonearm, the cartridge is angled once aligned. For s-shaped tonearms the requirements are a little different. If you have an s-shaped tonearm with a detachable headshell, the alignment process is simplified by using an overhang gauge.
Overhang refers to the distance the stylus “overhangs” the turntable spindle. Check your turntable manual for the specific requirement. For example, my Technics SL1500c requires an overhang of 52mm. You can measure this using a set of calipers, but an overhang gauge will make the process easier. The cartridge is aligned when the overhang is set to the correct distance and the cartridge body is parallel to the headshell. (Facing dead straight). For a complete video guide on how to change a phono cartridge on an s-shaped tonearm, check out our previous guide on this topic.
We hope you found this guide useful. If you have any questions, let us know in the comments below.
I love analog !
For optimum performance go to analog majik and watch 9 short videos on optimum setting