
There are many reasons why you might want to replace the cartridge on your turntable tonearm. You could be looking to upgrade the performance and sound quality, or you might be looking to play older mono records or even vintage 78s. In some cases, you might purchase a turntable used and simply need to fit a new cartridge of your preference.
Fortunately, fitting a new turntable cartridge doesn’t have to be complicated. Simply follow a few simple steps and you’ll be ready to spin in no time.
For this demonstration, we’re going to explain how to replace the cartridge on an s-shaped tonearm. These designs typically have a detachable headshell and require a slightly different procedure than a straight, single-piece design.
Purist audiophiles will often prefer a single-piece design for its rigidity and reduced connection points, which some feel compromises audio performance. However, a detachable headshell makes swapping from one cartridge to another much easier, as you can easily pre-align multiple cartridge options. You may still need to adjust the VTA (vertical tracking angle) and tracking force from one cartridge to the next, but the workload is still significantly reduced.
Here’s how to install a phono cartridge on a half-inch mount headshell and alight for an s-shaped tonearm.

Kit You Will Need:
- Longnose pliers
- A flathead precision screwdriver. (This may vary depending on the supplier screws, but in many cases, the manufacturer will supply a tool).
- Calipers (Or a Technics Stylus Gauge)
- Cartridge Alignment Protractor
Removing the Supplied Cartridge (If there is one)
1 – Attach the stylus cover, and loosen the locking nut to remove the tonearm’s headshell.
2 – Loosen then cartridge mounting screws to remove the cartridge.
3 – Gently remove the wires from the cartridge terminals using longnose pliers.

Attach the New Cartridge
1 – Keep the stylus cover or guard on for now. In some cases, it might be safer to remove the stylus.
2 – Attach the cartridge temporarily at the furthest setting, allowing plenty of room to move the wires. Your cartridge may come with mounting instructions, so it’s best to follow those if you have them. If the manufacturer supplied new screws, use the ones they provide. Some models require screws only; others use screws and nuts.
3 – Gently connect the wires using your longnose pliers. You’ll feel them click into place, but don’t push too hard as to risk damaging anything.
They are clearly color-coded and should be connected as follows:
- Red lead – R+ (Red)
- Green – R- (Green)
- White – L+ (White)
- Blue – L- (Blue)
Adjusting the Overhang
For this step, you’ll need to carefully remove the stylus cover or guard.
Overhang refers to the distance the stylus “overhangs” the turntable spindle. Check your turntable manual for the specific requirement. This particular turntable (The Technics SL1500c) requires an overhang of 52mm.
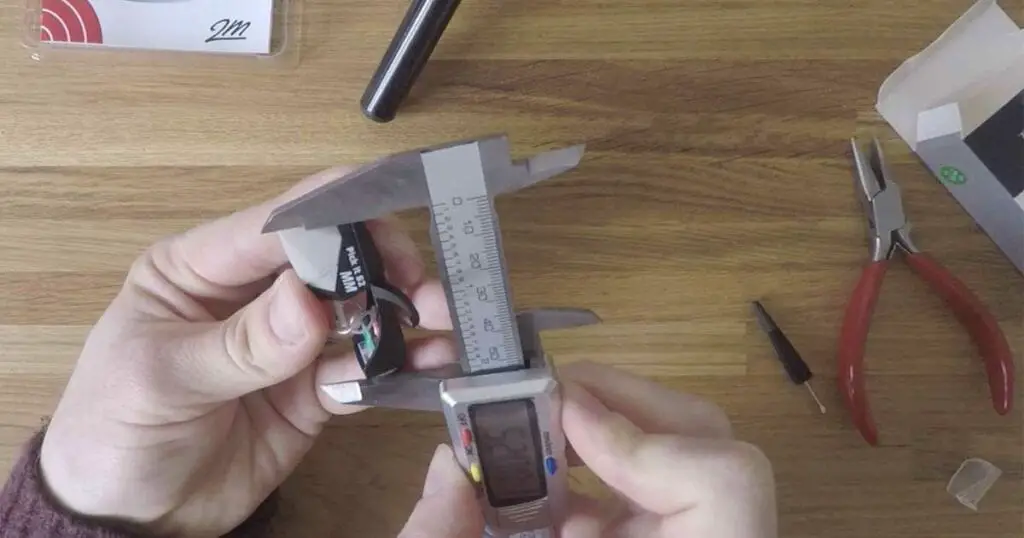
1 – Loosen the screws and use a set of calipers to measure from the bottom ring of the headshell to the tip of the stylus.
2 – When tightening the screws, the cartridge should be parallel on the headshell when viewed from above. In other words, it should be facing straight forward, not twisted at an angle. This is very different to fitting cartridges onto straight tonearms where the cartridge will need angling according to an alignment protractor.
3 – If you set the overhang and parallel position correctly, then the stylus should be perfectly aligned and ready to go. Tighten the screws carefully to ensure you don’t move the cartridge out of position.
4 – If you would like to check the alignment, you can use a cartridge protractor to ensure the stylus aligns with both null points. Most Japanese turntable manufacturers, such as Technics, use the Stevenson alignment protractor.
Adjust the VTA (Vertical Tracking Angle) & Tracking Force if Required
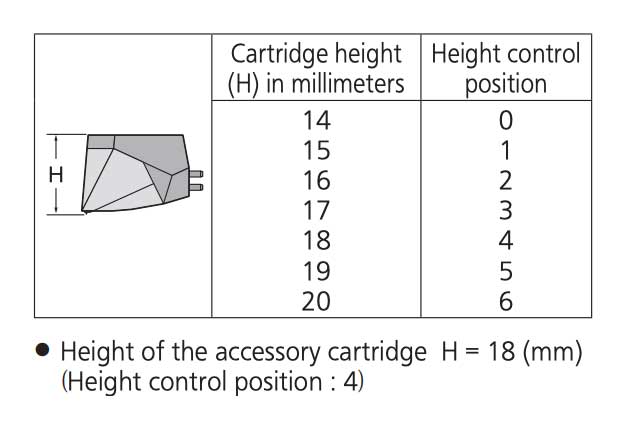
Swapping between different cartridges may require you to adjust for VTA. If one model is different in height, you will certainly have changed the stylus raking angle and will need to check the appropriate VTA setting for the new model.
The adjustment process will vary from one turntable to the next. Fortunately, with the SL1500c, the required VTA setting based on height is clearly explained in the manual. For the model I’m fitting (a Pro-Ject Pick-It S2) the cartridge height is 18mm, which requires me to adjust the VTA dial on the turntable to position 4).
For the tracking force, I like to use a digital tracking force gauge to ensure accuracy. I used the NeoTech model. Check your cartridge manual for the correct tracking force and adjust accordingly.
The Bottom Line
Detachable headshells give you fantastic flexibility. It makes switching from one type of cartridge to another as simple as possible. I like to have a few different stereo cartridges ready to go, as some models suit certain records better than others. I also like to have a dedicated, true mono cartridge on the side for playing back mono records and older 78s. (I use the Ortofon 2M mono, which is interchangeable between their mono and 78 styli.
You can learn more about why you invest in a specialist mono cartridge in our previous article. Yes, you can play mono microgroove records with a stereo cartridge, but the sound is always superior when using a dedicated, true mono cartridge.
I wonder why you need to use a caliper if what it appears is to simply use the protractor instead and align the needle to the round dot I saw in the video?
Get the distance right with a caliper, and the cartridge parallel – the protractor should basically just be a formality to check everything is correct. Happy spinning.