A clean, well looked after vinyl record is a joy to behold, and in my opinion, the best way to experience your favorite music as the artist intended. Dirty records, on the other hand, will quickly have you reaching for the mute button. If you’ve just started your vinyl hobby—or you’ve recently rekindled the old record flame—the chances are you’ve come across a few records with excessive pops and clicks. Fortunately, so long as the record grooves are not scuffed, scratched, or worn out, there’s a good chance you can bring them back to their former glory.

How Do Records Get Dirty?
Over time, dust, dirt, grease (or worse), builds on the surface of your record. Eventually, much of this unwanted dirt becomes entrenched in the record grooves, and this manifests as the infamous pops and clicks we all know. Clearly, good practice record care will help you keep the build-up of dirt to a minimum, but if you’re able to keep your records 100% clean without occasionally having to give them a spruce up every once in a while, you’re a better person than me! Also, if you’re buying your records second hand, there’s no telling how well those records were treated. In most cases, a quick clean before its first spin is essential—least of all to help protect your delicate (and likely expensive) record stylus.
Fortunately, record cleaning doesn’t have to be complicated, difficult, or labor-intensive! Here’s a quick crash-course on how to clean vinyl records quickly and most important of all—effectively.
Simple Steps to Clean Vinyl Records
1 – Dry Clean Your Record
First things first, to avoid moving dirt around, you must first dry clean the record using an anti-static record brush. If you don’t already own one, you should change that pretty quickly and start incorporating one into your daily playback routine. So not only do you want to use an anti-static carbon-fiber record brush before proceeding with any of the following steps, but you also want to use this brush daily to keep dust and debris at bay. Like cleaning your home, little and often prevents a much bigger job further down the road.

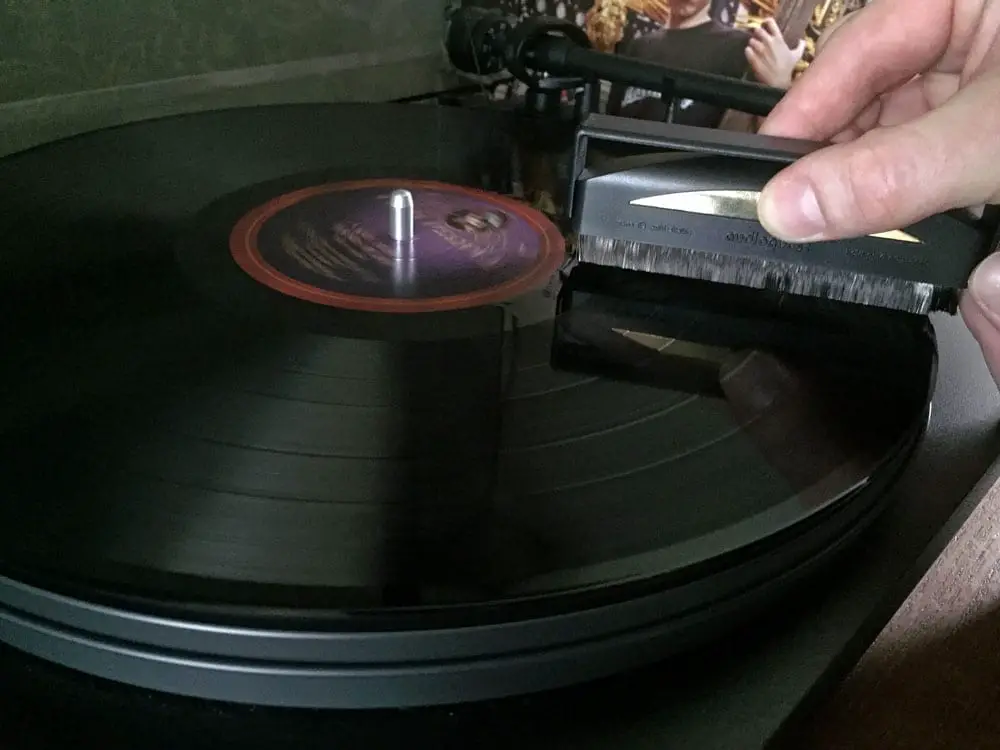
There are plenty of options available on the market, but we like the new AudioQuest model. Their latest design is said to improve the conductivity of static electricity and facilitate better cleaning of micro-dirt particles thanks to the greater quantity of tiny fibers.
The correct method for using a carbon fiber record brush is a hotly debated topic, but here’s how we do it:

- Gently hold the brush over the record so the carbon fibers just tickle the surface. You want to allow the fiber tips to penetrate the grooves.
- While holding the brush gently in place, allow the record to spin on the platter a few times.
- Most of the dust will gather at the front fibers. Now, gently scoop up the front fibers allowing the rear set to catch anything missed by the front. Now lift the brush and repeat this process if necessary.
- Inbetween each clean, you can use the handle to clear any collected dust by rocking the fibers back and forth through the handle. This way, you don’t have to touch the brush with your greasy fingers.
Older records that were stored poorly—or worse still, left out of their sleeve regularly—may require repetition of the dry cleaning process to catch all of the offending debris.
2 – Select Your Record Cleaning Fluid
Once you’re confident all the dry dust and debris particles are removed from the surface of the record, you can now proceed with wet cleaning. For this, you’re going to need some record cleaning fluid.
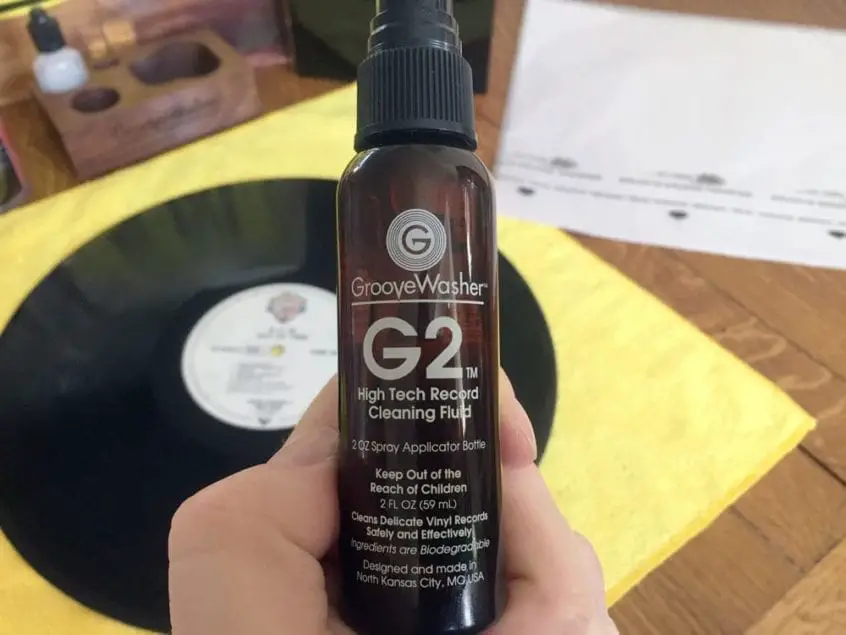
Again, there are countless options on the market, but we like GrooveWasher the best. There are plenty of DIY alternatives out there pitched by self-appointed experts, many of which contain high levels of isopropyl alcohol. Opinion varies on the use of alcohol to clean vinyl records, but many believe high amounts of it to be potentially harmful to your records. Please do yourself a favor and purchase a purpose-made vinyl record cleaning solution developed by a company that knows what they’re doing—be it GrooveWasher or otherwise. For this article, we’re using GrooveWasher.
BONUS: Sound Matters readers receive 10% off direct orders from GrooveWasher when using the discount code: SOUNDMATTERS10
3 – Apply the Record Cleaning Solution as follows:
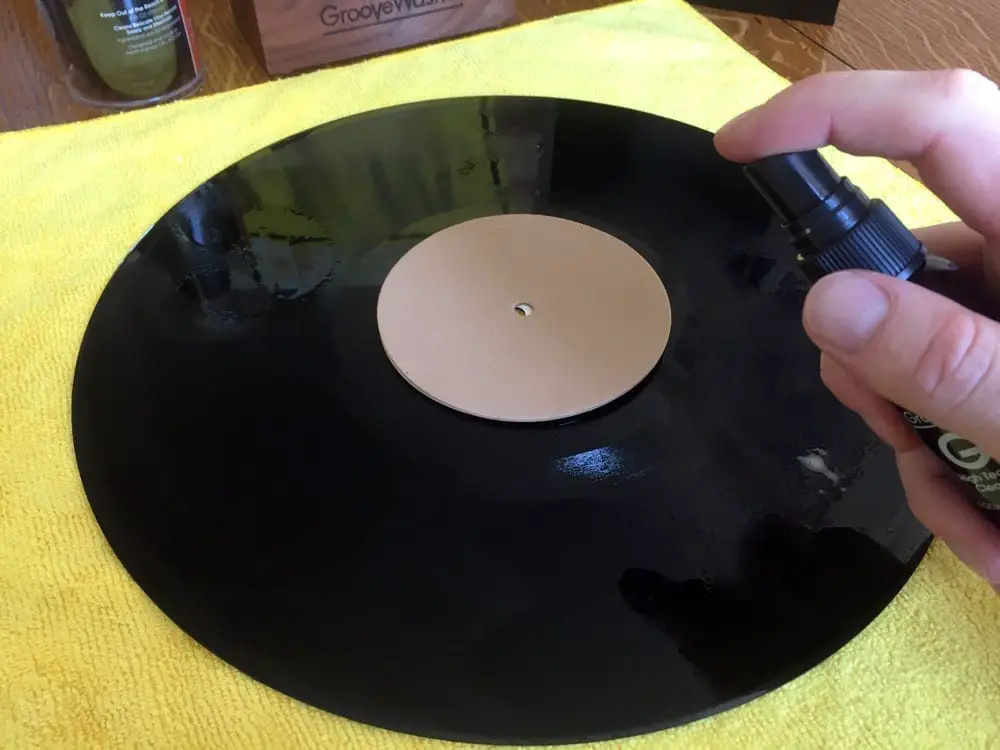
Step 1: Carefully place the record on the microfiber cloth or record cleaning mat. Place the record label protector disk on the record label. Spray five or six mist sprays to cover the record surface completely. Wait ten seconds or more (I like to leave the fluid on the record surface much longer for older, very dirty records).
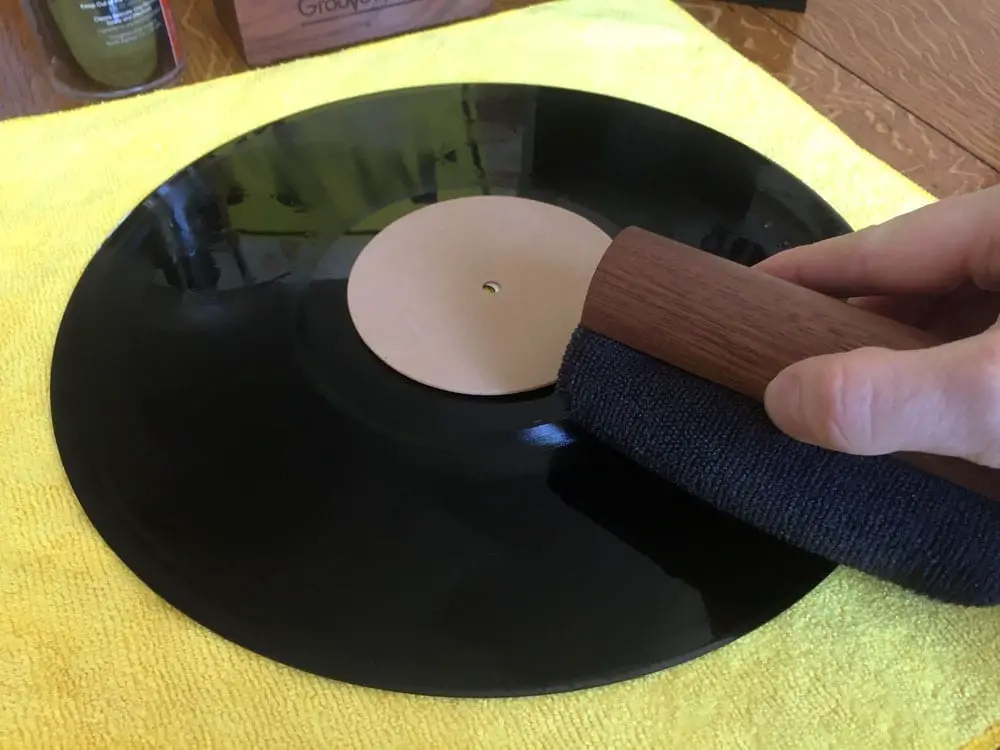
Step 2: Set the cleaning pad base into the wood handle. (You can also use a standard microfiber cloth), but in this case we’re using GrooveWasher’s beautiful walnut-handled record cleaning pad).
Step 3: Lightly apply the leading edge of the pad to the record and wipe the record in concentric arcs (with the grooves, not across). Wipe the entire record at least three times with moderate pressure.
Step 4: Rotate the pad to gently dry and groom the surface. If visual inspection shows a problem area, respray it with the cleaning fluid, wait a few seconds, and use the pad to gently scrub the area, but only in the direction of the grooves.
Step 5: Allow the record to air dry before playing. Some record cleaning solutions require or recommend a secondary rinse stage using distilled water and a separate microfibre cloth to dry. You can do this if you wish, it certainly won’t hurt, and in some cases, it’s practically required to avoid leaving residue behind. Our example cleaning fluid, however, dries residue-free and does not require a second step.
See, we told you this would be quick and easy!
Note: if the record still sounds dirty after cleaning. Repeat the process and see if you notice incremental improvements. In my experience, very dirty records can be cleaned up a treat with a little diligence and patience.
4 – Place the Record in a Clean Sleeve
After all that hard work, the last thing you want to do is undo all your good efforts by returning the disk to a dirty sleeve! Invest in a pack of good quality, anti-static polyethylene inner sleeves. Just be sure the record is bone dry before you place the record inside as any lingering moisture could introduce mold.
The Bottom Line
Ask ten people how to clean vinyl records and you’ll get ten different answers. The steps we’ve outlined are a quick and easy way to get started by hand. Those wishing to clean large amounts of vinyl may want to consider investing in a record cleaning machine, such as a simple record bath, or a more advanced, dedicated record cleaning machine. For more info on the many different methods and machines available, check out our feature article on how to clean vinyl records.
Thanks, if a brand new record has lots of pops in it, why would that be? I’ve cleaned it with anti static brush but not this method yet.
I recently got a project VC-E record cleaning machine. The original machine I got The project VC-s Leaked and they upgraded me to the project VC-E, I’m using L’ Art du son record cleaning fluid it’s a bit pricy but works well.. it contains no alcohol. the other stuff is TM8 which is good as well but, also a bit pricy.
This article was my introduction to Sound Matters, I also bought the GrooveWasher System based on your recommendation and have not been disappointed, it is an outstanding product. I also bought the MoFi archival inner sleeves and loved them, went for a cheaper knoc- off the next time and will not make that mistake again.
Hi Dave. That’s great. Glad to hear it worked out for you. GrooveWasher is my number one recommendation for hand-cleaning vinyl. Thanks for being a subscriber and enjoy the music.
[…] that Sound Matters likes the GrooveWasher cleaning formula. (You can read more about how we use this product, here). Whichever formula you settle on, the pros and cons are as […]
[…] via Sound Matters […]
Thanks for the tips Marc! Being in Australia I would highly recommend the liquid solution Wax Wash https://www.waxwash.com.au/. Their website says: ‘Superior Cleaning Power – Wax Wash is the only vinyl record cleaner that contains a mixture of superior cleaning agents to specifically target and remove residual montan wax from old and new vinyl records. It is also effective at removing excess PTFE’s in newer pressings’; and ‘Pure Ingredients – Wash Wax contains 100% pure ingredients, free of impurities. This ensures that as you clean your vinyl, no other contaminants are introduced’. There is also a video on their site showing you how to clean with it.
Hey Andy. Thanks for this, I’ll definitely check them out. (Always good to hear what else is out there). I’d love to try some if it’s available in the UK?
Hi Marc. Sorry for the delayed response. Their website says ‘MADE IN AUSTRALIA, BY AUSTRALIANS, FOR THE WORLD’ but only list Australian stockists but hopefully they can ship some to you.
Hi Marc,
Happy to send you some to try out. Send your details to [email protected]
Cheers Seton
Sounds good. ? I’ll be in touch.
Fine article, and great products for the price. Initially, I used the Spin Clean (which is a “bath” type system). It worked marvelously and was quite fun to use, if somewhat laborious. Then the vacuum type machines made me curious, so I plunked down and got the moderately priced Record Doctor V. What a difference! It was revelatory, pulling out debris the Spin Clean or other hand held style cleaners can’t come close to. Fast forward three years and my Record Doctor has apparently given up the ghost (inconsistent suction and other problems with the motor and assembly). So, it’s probably back to the Spin Clean for a while. I do have my eye on the Okki Nokki, but it’s almost as much as a turntable! I think the main point to all of this is to NOT re-introduce any of the dust and dirt you’ve removed, so keeping you cleaners clean is essential.
Yes indeed. Those vacuum-based record cleaners are great if you can afford them (takes all the grub away; much less chance of recontamination). As you say, if you go the hand cleaning route, clean pads or clothes are essential.
I’d love to try the Okki Nokki – I’ve used the ProJect one, which is also review on this website:
https://www.yoursoundmatters.com/pro-ject-vcs2alu-vacuum-record-cleaning-machine-review/
Firstly I would like to see a before and after photo of the grooves,with used records you never know what you are getting.The grooves may have been already damaged,how many in the real world change their stylus after 1000 hours.Audio playback before and after is the real test,Where does all that dust and dirt go after being picked by the micro fibre brush back on the next record to be cleaned
When I arrived at this page from the link in today’s Sound Matters email, a popup window offered a free “Top Record Cleaning Tools” e-book. It seemed familiar, and I found the “Top Record Cleaning Tools v1.pdf” file, dated Nov 29, 2019. The “v1” prompts me to wonder if it’s the latest edition and how I can find out about later editions.
Hi Ward. Thanks for your message. Version 1 (v1) is still the latest edition, although we are working on an update. As a Sound Matters subscriber, you’ll receive a notification once we update the file. Thanks for reading.